¶ Asset Naming
The name of the asset , It’s materials and its files must appear in lowercase and must not contain spaces or punctuation. This includes the extension/format.
Examples (only the first option is acceptable):
- marble_bust_01_diff.png (good)
- Marble_Bust_01_Diff.PNG (bad)
- marble bust 01 diff.png (bad)
We call the name of an asset the slug. (e.g. marble_bust_01)
Only Latin characters (a-z), numbers (0-9) and underscores (_) may be used for the slug.
It must be unique, no asset (even of a different type) can have the same slug as another asset. The slug is basically an asset’s unique ID.
¶ Textures
We like to keep a minimum texel density of 2048px/m, or for larger models at least 8K textures. As a rule of thumb, stick to 8K if you can, but for small objects where this seems like overkill, go down to 4K and check the texel density is still over 2048px/m. We don't accept textures lower than 4K resolution.
The naming of the asset and its files should follow the General standards mentioned above.
Texture name example: slug_map.format - E.g: marble_bust_01_diff.png
If there are multiple materials and corresponding textures, Make sure to name the textures to match the materials. E.g marble_bust_01_wood_diff.png
The image format should always be 16 bit PNG.
If possible please provide both the GL and DX normal maps.
Any alpha or opacity maps should be included as individual maps as well as baked into the alpha channel of the diffuse map.
¶ Blender - .blend file
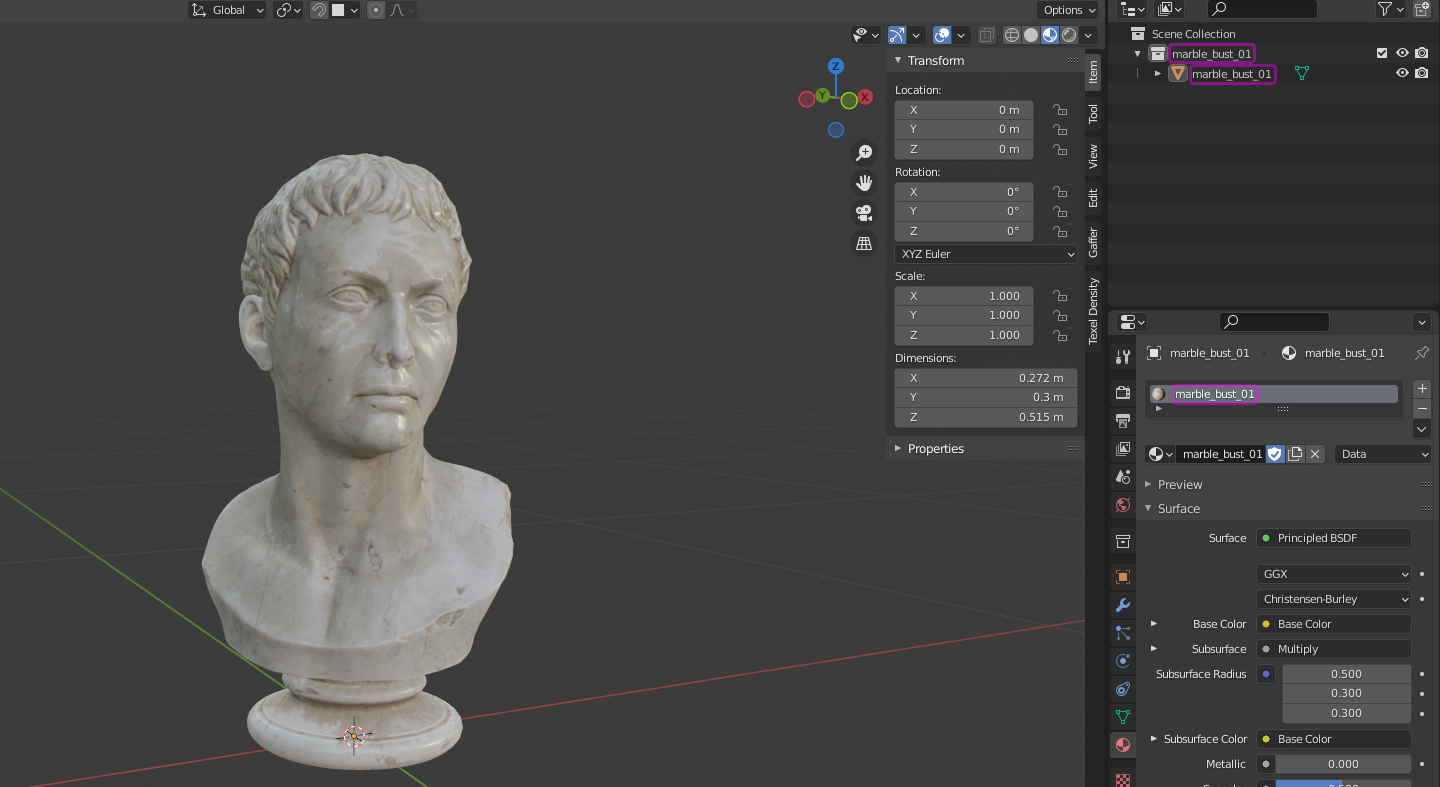
Inside blender the models should all be in a collection that shares the same name as the slug.
This collection should not include any unnecessary objects (e.g. camera & lights).
If the asset has only a single material or mesh, the material and mesh names should be the same as the slug. If there are multiple materials or meshes, prefix their names with the name of the asset. (E.g marble_bust_01_wood).
¶ Requirements
- Our primary format is a Blender file (.blend), but FBXs or OBJs will be accepted though in these versions you will need to apply all the necessary modifiers before exporting to these formats, and then re-import them into a new scene to check that everything still looks correct.
- When appropriate, aim to make the model subdivision-friendly. Avoiding triangles/Ngons/weird geometry as much as possible is important to make sure the model holds up when smooth subdivided. Models should still be as light as possible but still allow for adding further subdivisions. You may keep some supporting edge loops to help the model retain its shape when being smooth shaded. Having good flowing topology where possible will help this too. This will make them easy to use out-of-the-box, but also easy to export, or add additional subdivisions or modifiers.
- When appropriate, models should be topologized into quads.
- Models must not have any bad geometry such as Ngons, floating verticies or faces with zero area.
- All models should be fully UV-uwrapped with no mirrored or stacked UV’s unless in some specific cases where stacked or mirrored UV’s is required. - E.g: Plant leaves and Modular assets using a Trim sheet method.
- To ensure correct UVs, be sure to apply modifiers that add new geometry (solidify, mirror, etc)
- Model needs to be placed naturally at the world origin facing -Y with rotation and scale applied.
- Scene needs to be completely clean with no other objects present other than the ones that are intended to be shared.
¶ General Good Practice
- It is important that we get the dimensions as correct as possible. We primarily use the metric system for our measurements. Use a human-sized scale reference to import and use as a visual comparison to ensure all assets are being made with the same scale. We’re not doing precision CAD work, but still good to check that our asset proportions are realistic.
- Small shapes can be done with normal maps/displacement. As a general rule of thumb: if it’s a small detail and it doesn’t affect the silhouette, it can be done with a Normal map. One exception to this is bevels, chamfers and fillets: sometimes these can be done with a normal map, but for the most part we want most of them on the model itself.
- Use the latest official Blender release.
¶ Poly Count
In a nutshell, we recommend polycounts to be as low as possible without affecting the quality of the silhouette if viewed in full screen at 1440p (or a bit zoomed in at 1080p).
- The poly count value should be based off of the number of triangles.
- Though it is important that we keep the model light, It should not come at the cost of quality or the potential to subdivide.
- We treat each asset as a hero asset that can be used for many purposes from real time engine use up to high quality VFX. We aim to create an asset that sits in the middle of these two points, but err on the side of higher quality in order to remain future-proof when hardware improves.
- Overall polycount will come down to many factors such as complexity, size and most often the curvature involved in the model. There is no consistent way to regulate how many triangles to use, so use your own discretion but included below is a list for some points of reference.
- Make sure there are enough polygons to hold up rounder surfaces like wheels, rings and circles.
- For some point of reference standard props at the sizes of 20 - 60 cm = +-7000 tris, 60cm - 1m = +-15000 tris.
If you require clarification or would like to discuss some of these aspects feel free to join our discord and ask there.
¶ LODs
Assets don't have to have LODs, but if you want to make them, these are our standards...
Structure them as slug_LOD0, slug_LOD1 ... subcollections inside the main slug collection so that they can be detected and swapped out automatically.
LOD0 is the base asset with the highest detail. LOD1 is the next level down, containing about half or less the detail and polycount. LOD2 is half that again, etc.
When approaching the smallest polycount LODs, feel free to reduce detail exponentially, such that only the rough silhouette remains and the asset is suitable to be seen from very very far away.
3-4 LODs are ideal. Never use more than 9 LODs. This is not only overkill, but having more than a single digit breaks the naming convention of "_LOD
?" which our add-on and other software expects.
¶ Geometry Nodes
Models that use geo nodes need to be handled in such a way that our add-on can mark the appropriate data as assets to be presented in the asset browser, and also so that FBX, USD and GLTF exports are functional.
In a nutshell, there needs to be:
- A
slug_geometry_nodescollection, which contains all content relating to the geo nodes version of the asset. - A static version of the asset, in a
slug_staticcollection - or if LODs are used, aslug_LOD0collection.
Both of these collections must be inside the main slug collection.
The intension here is for users to be able to customize the asset when needed, but in most cases users simply want a static "baked down" version to use.
Here is an example hierarchy for a geo nodes asset with LODs:

And one without LODs:
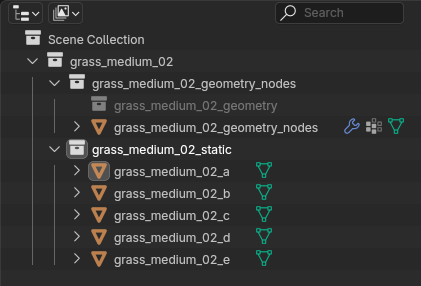
Our add-on (and FBX/etc. exporters) will look for the slug_LOD0 collection first and mark that as an asset. If it doesn't exist, it looks for slug_static. Then, it will also look for a slug_geometry_nodes collection to mark as well.
¶ Grass / Scatterable Content
The grass is presumably scattered on a sphere using geometry nodes. This geo node tree must be named slug_scatter.
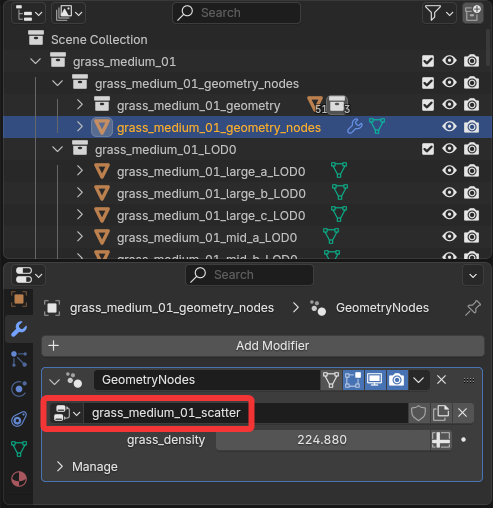
Our add-on will mark this as an asset instead of the slug_geometry_nodes collection.
The static collection will still be marked as an asset as well.
¶ Default Values
Additionally, the node's default input values need to be set correctly, so that when imported from the asset browser it will resemble your intended result.
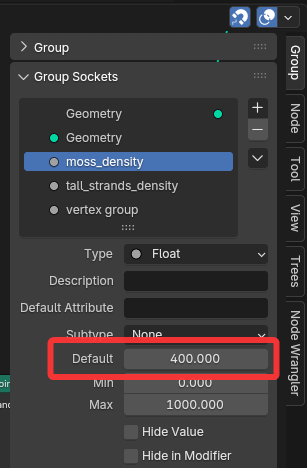
If using any kind of vertex group masks that may not exist on the user's mesh, then ensure the default value is 1.0, otherwise no grass will show at all.
¶ Rigging
Assets are not required to be rigged, but if you want to rig your asset, we have some standards to keep all our rigs somewhat consistent.
The goal is mainly to strictly separate deform bones and control bones, so people can change the latter for their own need without having to redo the weight deform work. The rig should be a "one to fit them all" solution, and should aim to be easy to modify for specific needs.
- Drivers are ok, but do not use any scripts as they will not be imported for security reasons.
- Use only one armature for each object.
- All the objects involved in the rig should be parented to the armature.
- Save the file in pose mode and Viewport Display of the Armature without "In Front" checked.
- The armature should be named with the
rig_prefix. - The first bone collection
DEF deformationis for deformation bones only. - The objects deformed by the rig must be handled through an Armature modifier and a proper Vertex group and not with the parenting to bone workflow. It will help prevent messing with the armature in the case that later objects are joined or some of its parts separated.
- The master deformation bone should be called
def_rootand should be placed with its axis aligned with the world. - Deformation bones names should begin with
def_. - Deformation bones should be parented to the root bone
def_rootonly. - Deformation bones should be constrained with "Copy Transforms" to a target, a similarly named bone in
TGT targetbone collection, named withtgtinstead ofdefat the start. For example,def_headwill be constrained totgt_head. def_bones should be given a Bone color and a Pose bone color with the red "01 - Theme Color Set"
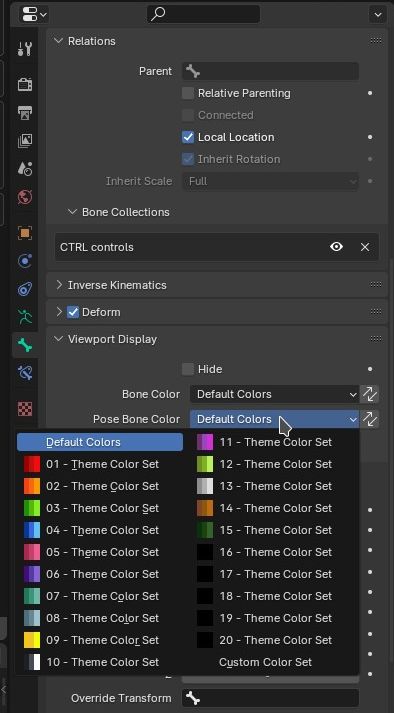
tgt_bones should be given a Bone color and a Pose bone color with the orange "02 - Theme Color Set"- Control bones names should begin with
ctrl_. - The last bone collection is for
ctrl_control bones only. - IK controller bones should be aligned with the global axis or be a child of a bone aligned like this (i.e., like
def_root), and if the latter, with the "Local location" of Relations section left unchecked. - Control bones should be limited in translation, rotation, and scale according to the proper use of their influence on the rig.
- Control bones should have custom shapes that make it clear what they are used for.
- The custom shapes should have arrows to indicate possible axis of rotation/movement if there are some limitation constraints on them.
- Control bone custom shapes should be kept in a separate deactivated collection called
wdg_widgets(>> question to see if they should have Geometry nodes modifier applied or not if it is needed for simple editing) and have their names beginning withwdg_. - All bones that are not deformation bones, target bones, or control bones should be prefixed with
tech_and put in any bone collection except the first (for deformation bones only), second (for target bones only) and last (for control bones only). They can be grouped in just one bone collection or separated in several for ease of use/better visibility. - You can add more bone collections for ease of use/organization of bones, as long as bones are also in their mandatory collection. ie: a
def_bone for the wheel of a car must be in aDEF deformationbone collection, but could also be part ofwheelsanddirectionbone collections. - Any helpers for the rig (i.e., empties) should be kept in a separate deactivated collection called
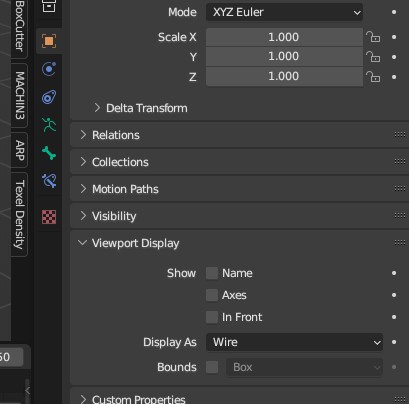
hlp_helpersand have their name beginning withhlp_. - For ease of reading bones in the viewport, please change the display settings of the Object containing the rig to "Wire", as shown below.
¶ Final Deliverable Structure
The folder name should match the asset name exactly. We have a lot of similarly named assets, so this is important to avoid confusion.

No file or folder names can contain capital letters. This is because Windows doesn't care about whether text is upper-case or lower-case, but Linux does. Best to stick to lower-case only.
All texture files should start with the asset name and be placed in a textures subfolder:

There should be a top-level collection that matches the asset name and contains all objects intended to be imported. If your asset has only a single object, then the object name should match the asset name too.
¶ Standard texture map suffixes
These are the suffixes used in image file names to denote the map type, e.g. "marble_bust_01_diff.png".
We standardize these map types to ensure consistency across all textures, and allow automations and validations.
Maps that all models should have (though there are exceptions):
diff: Diffuse, Albedo, Base Colour, Colourrough: Roughness, Inverted Specular Mapnor_gl: Normal map in OpenGL formatao: Ambient Occlusion, AO
Other maps that you might have, depending on the model:
metal: Metallicdisp: Displacement, Height, Macro bumpalpha: AlphaMask, Transparencyemission: Emission Colour on black BGmask: Any Additional masking information
Maps that we automatically generate for all models (no need to provide it yourself):
nor_dx: Normal map in Direct X format (we will automatically generate this, no need to provide it)arm: Packed: Ambient, Roughness, Metallic (we will automatically generate this, no need to provide it)
Image files must be named according to this pattern: name_suffix.png. E.g. “marble_bust_01_diff.png”.
It's not necessary to include the resolution in the file name.